|
Product nameŁş |
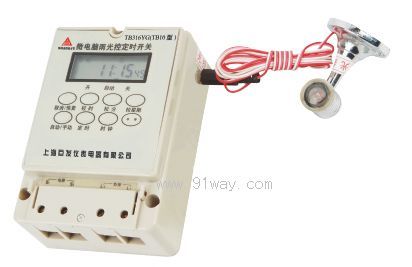
TB-10 microcomputer time control switch (optical time control)
|
|
specificationŁş |
|

 Zoom in on the image Zoom in on the image |
|
CategoryŁş |
low-voltage electrical apparatus
-- Time-controlled switch |
|
PriceŁş |
factory price |
|
BrandŁş |
Shanghai |
|
Place of OriginŁş |
China |
|
Available QuantityŁş |
batch |
|
delivery cycleŁş |
Spot goods (or inquire by telephone) |
|
| |
Shanghai Beiyuan Industry and Trade Co.,Ltd
+86-21-66770508
+86-139101609058 |
 91way@163.com 91way@163.com
 13916500500(Wechat) 13916500500(Wechat)
|
|
|
|
TB-10 microcomputer time control switch (optical time control)Detailed product descriptionŁş

The TB-10 microcomputer time control switch (light time control) can automatically turn on and off the power of various electrical equipment according to the user's set time. The controlled objects can be streetlights, neon lights, advertising signs, production equipment, broadcasting and television equipment, and all other circuit devices and household appliances that need to be turned on and off at regular intervals.
performance metrics
Standard working power supply 220V/50Hz
Applicable voltage range: 160V~240V
Switching Capacity Resistance 25A
Power consumption<4W
Time control range: 1 minute to 168 hours
Environmental temperature -10~50 ˇć
Timing error<ˇŔ 2 seconds/day
Environmental humidity<95%
Dimensions 126 ˇÁ 88 ˇÁ 51mm
Weight 510g
There are 10 sets of switch times, which can be used manually or automatically;
Operation Instructions for TB-10 Microcomputer Time Control Switch (Light Time Control)
1. First, check if the clock display is consistent with the current time. If recalibration is required, while holding down the "Clock" button, press and hold the "Calibrate Week", "Calibrate Time", and "Calibrate Minute" buttons respectively to adjust the clock to the current accurate time:
2. Press the "timer" button once, and the word "1 on" will appear at the bottom left of the display screen (indicating the first time it was turned on). Then press "School Week" to select work modes such as six day work system, five-day work system, three-day work system, daily same, daily different, etc., and then press the "School Hour" and "School Minute" keys to enter the desired start time;
3. Press the "timer" button again, and the word "1 off" will appear at the bottom left of the display screen (indicating the first time it was turned off). Then press the "school week", "school hour", and "school minute" buttons, and enter the desired date and time for turning off (note: the date of turning off must correspond to the date of turning on);
4. Continue pressing the "timer" button, and the lower left corner of the display screen will show "2 on, 2 off, 3 on, 3 off,..., 10 on, 10 off" in sequence. Refer to steps 2 and 3 to set the switch time for each subsequent switch;
5. If 10 sets of switches do not need to be set every day, the "Cancel/Restore" button must be pressed to eliminate the excess time of each set and display the "--: --" pattern on the display screen (not 00:00);
 Related ProductsŁş
